Laravel Raw Statements for Database Queries

Laravel has a powerful query builder but there are limitations when database queries become more complex.  Enter Raw queries.

The docs have an example  of a raw query which will get you going but sometimes there is a need to completely ditch the builder and and go it alone.

The following example is what I used create a query which is completely raw.

DB::select(DB::raw('
        SELECT  Months.id AS `month` ,
            COUNT(story.id) AS `count`
            FROM 
            (
              SELECT 1 as ID UNION SELECT 2 as ID UNION  SELECT 3 as ID UNION SELECT 4 as ID 
              UNION  
              SELECT 5 as ID UNION SELECT 6 as ID UNION SELECT 7 as ID UNION SELECT 8 as ID 
              UNION  
              SELECT 9 as ID UNION SELECT 10 as ID UNION SELECT 11 as ID UNION SELECT 12 as ID
            ) as Months
            LEFT JOIN `story` on Months.id=month(story.created_at)
                                   AND 
                                   (company_id = :companyId) 
                                   AND (YEAR(created_at)= :thisYear)
            GROUP BY Months.id 
            ORDER BY Months.id ASC'), array('companyId'=>Auth::user()->company_id, 'thisYear'=>Carbon::now()->year));

The important thing to notice here is that when using the raw query you can pass variables straight into the query which could be a security issue especially if the information is being passed from a from by a user.

To ensure that any values that need to be passed to the query are sanitized they can be passed in an array after the query.

Take a look at the query and the ‘And’ clauses.

company_id = :companyId

The :companyId in the example is how you add your variables using the array.

...ORDER BY Months.id ASC'), array('companyId'=>Auth::user()->company_id, 'thisYear'=>Carbon::now()->year));

In the array give the key and then the value to be added.

That is it.  Hope it helps with your complex Laravel queries.
cURL error 60: SSL certificate problem: unable to get local issuer certificate – Laravel Notifications error

In a new application I was adding in Slack notifications and while testing I got cURL error 60: SSL certificate problem: unable to get local issuer certificate...

I am working on a Windows 10 machine with xampp.  I found the solution on Laracast Forum with a little bit of effort so I thought I would outline the steps succinctly to save a little time in the future.

I am going to assume that you have a version of Guzzle which is 6.2 or around that.

Step 1.

Download a fresh PEM file from this link https://gist.github.com/VersatilityWerks/5719158/download

This is a zip file which you will save into xampp.

Step 2

Unzip this file and save the file cacert.pem in D:/xampp/php/extras/ssl.

Step 3

Update the php.ini file.  D:/xampp/php/php.ini

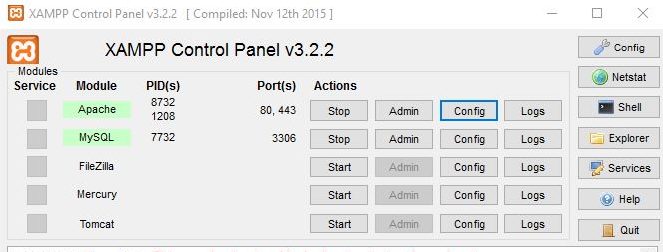
Alternatively to locate the php.ini file open the XAMPP control panel and click on Config adjacent to Apache.

Search and find curl.cainfo and add the full path to the the cacert.pem file you just added.
The new line should be something like this:
curl.cainfo = D:\xampp\php\extras\ssl\cacert.pem

Step 4

Restart Apache and try and fire off your notification again. It should just work now.

Bootstrap 4 open remote modal from select

In a recent project I have upgraded from Bootstrap 3+ to Bootstrap 4.  I am currently using Bootstrap Alpha 6.

If you used remote modals where you essentially injected content from another place into your modal and you port your code over to the new Bootstrap 4 this is not longer possible in the way that you are currently doing it. As of Bootstrap 3.3.7 ‘remote’ was depreciated and in Bootstrap 4 it has been completely removed. 🙁

It is possible to get things to work again but it has taken me a bit of time and effort to get what was working well, to work again, with the new framework.  So I hope that this will help.

The select.

Notice that data attributes are included for each option. The last one data-url can be whatever you want to call it.  I called it url as I am passing a url.  You can pass whatever value or page you want.

 <select id="something" class="form-control">
       <option value="0">Select one</option>
       <option data-toggle="modal" data-target="#myModal" data-url="/go/to/somewhere">Option 1</option>  
</select>

When an option is selected it will hit our jQuery which is as follows.

First it will hit #something when it detects that a selection has been made. It will then open the Modal with an id of 'myModal'.  See comments for further explanation in code below.

<script>
    // Add an outcome to a document
    $(document).ready(function(){
        //Open modal from dropdown select.
        $("#something").change(function () {
                $("#myModal").on("show.bs.modal", function(e) {
                    var select = $(e.relatedTarget);// Select that triggered the modal
                    var link = select.data('url'); //Our custom data which we want to pass to the modal body.

                    $(this).find(".modal-body").load(link);//Pass the custom data to the modal body which is loading a link page.
                });
            //Reset the select back to select an option
            $("#something option:selected").prop("selected", false);
            $("#something option:first").prop("selected", "selected");
        });
    });
</script>

Oh, the bottom two lines reset the select after a selection has been made.  You may not need those.

The modal ‘myModal’.

<!-- Modal Curriculum-->
    <div class="modal fade" id="myModal" tabindex="-1" role="dialog" aria-labelledby="View Curriculum" aria-hidden="true">
        <div class="modal-dialog modal-lg">
            <div class="modal-content">
                <div class="modal-header">
                    <button type="button" class="close" data-dismiss="modal" aria-hidden="true">&times;</button>
                    <h4 class="modal-title" id="myModalLabel">Outcomes</h4>
                </div>
                <div class="modal-body">

                </div>
            </div>
        </div>
    </div><!-- /.modal -->

Then the .load will load the ‘remote page’ from the url.  This could be just a html page or whatever you want but the ‘load‘ will pull it in and insert it into the .modal-body as we wanted.

That is it.

Laravel error – Syntax error or access violation: 1071 Specified key was too long; max key length is 767 bytes

When trying to migrate the Auth database tables on a fresh Laravel 5.4 install I got the following error.

[Illuminate\Database\QueryException]
  SQLSTATE[42000]: Syntax error or access violation: 1071 Specified key was too long; max key length is 767 bytes (SQ
  L: alter table `users` add unique `users_email_unique`(`email`))

Aftera bit of Google’ing I found a solution that workded for me.

Add the following line in the users migration file.

 Schema::defaultStringLength(191);

So the create_users_table should look like this.

public function up()
    {
        Schema::defaultStringLength(191);
        Schema::create('users', function (Blueprint $table) {
            $table->increments('id');
            $table->string('name');
            $table->string('email')->unique();
            $table->string('password');
            $table->rememberToken();
            $table->timestamps();
        });
    }

Original solution was found here.

Using Factories to seed your database with Laravel

I have recently explored factories for seeding my database. Previously I looked at seeding a database in a way which is very simple but necessary for my needs.  I also needed some dummy data on bulk to save a little time so I have used a factory to do this.

So I needed to add some dummy data to a table but I needed it to follow some specific rules.  This is what I did.

Open database\factories\ModelFactory.php

$factory->define(App\FrameworkOutcome::class, function (Faker\Generator $faker) {
    return [
        'framework_id' => rand(1,3),
        'category_id' => rand(1,5),
        'outcome' => $faker->sentence(10),
        'order' => 0,
        'active' => 0,
        'created_at' => date('Y-m-d H:i:s'),
        'updated_at' =>  date('Y-m-d H:i:s')
    ];

});

There is a factory for users already set up and ready to go.  It is pretty self explanatory but I will expand a little on what I did.  If you want you can skip down to where I add in the call within the DatabaseSeeder.php to get it to run.

In the code above and for your needs you can override any details you want by passing an array for your table contents.

The FrameworkOutcome model I am working with relates to two other tables Framework and Categories.  Suffice it to say that I have populated these tables but to make my outcomes relevant to these other tables I have had to specify certain attributes such as 'framework_id' needs an integer of 1, 2 or 3.  I used rand(1,3) to achieve this and the same for ‘category_id’.

I used $faker->sentence with 10 words in the sentence. There are a bunch of faker formatters which can be found on the Github page.

Now once this is all set up, go to database\seeds\DatabaseSeeder.php and add the following line in the ‘run’ method.

factory(FrameworkOutcome::class, 20)->create();

Run the seeder: php artisan db:seed

Twenty records with random data within the specified guidleines will be added to the database.

Laravel database seeding

This is a very simple example of Laravel’s seeding to populate a new database with some data.

I often rollback and refresh my database migrations while I am developing in Laravel.  The thing is I generally need to have at least a user in the database in order to login and get access to the app.  So using the seed feature with Laravel is a big time saver for this.

So right out of the box there is file where information can be added to insert new information into the database by running a 'php artisan' command.

Open your app and find 'database\seeds\DatabaseSeeder.php'

public function run()
    {
        DB::table('users')->insert([
            'name' => 'Paul',
            'username' => 'admin',
            'email' => 'example@example.com',
            'password' => bcrypt('password'),
            'created_at' => date('Y-m-d H:i:s'),
            'updated_at' => date)'Y-m-d H:i:s')
        ]);

    }

Run: php artisan db:seed

It is also possible to run the seed with a migration as well.
php artisan migrate --seed
php artisan migrate:refresh --seed
After running the seed command (assuming no errors) your tables will be populated with the user details or whatever you need.

If you need to add multiple rows of data you will need to send an array of arrays like so:

 DB::table('users')->insert([
            [
              'name' => 'Paul',
              'username' => 'admin',
              'email' => 'example@example.com',
              'password' => bcrypt('password'),
              'created_at' => date('Y-m-d H:i:s'),
              'updated_at' => date)'Y-m-d H:i:s')
             ],
             [
              'name' => 'Bob',
              'username' => 'bobby',
              'email' => 'bob@example.com',
              'password' => bcrypt('bobspassword'),
              'created_at' => date('Y-m-d H:i:s'),
              'updated_at' => date)'Y-m-d H:i:s')
             ]
        ]);

Note: how both the rows of data are their own array but they are wrapped within an array.

It is also possible to insert using the model instance e.g.

User::insert([
      [
        //Your code here
       ],
      [
        //Etc
       ]
]);


Don’t forget to add use App\User above the class at the top of the page or change User to App\User above.

Oh, one last thing.  When you use insert the updated_at and created_at fields will not be populated, therefor using date('Y-m-d H:i:s') will remedy this. It is also possible to use the User::create however you can only pass a single row.

If you need to add more data, check out factories. They make adding heaps of data a cinch.

Adding the Laravel Plugin to PhpStorm

The Laravel plugin assists with Blade templates including the new Laravel 5.4 update which includes slots and components.

Download the plugin for PhpStorm.

Go to Jetbrains and locate the plugin. https://plugins.jetbrains.com/idea/plugin/7532-laravel-plugin

Save to your computer somewhere and remeber where this is.  Desktop is easy.

Add the plugin to PhpStorm

Go to settings > plugins and click the button down the bottom. ‘Install plugin from disk…’

Locate the plugin Laravel.jar you have saved somewhere and select and install it.

Restart PhpStorm

Activate the plugin for your project.

Open the project you want to use the Laravel plugin for. Obviously this should be a Laravel project.

Settings > languages & frameworks > Php > Laravel

Check the ‘Enable plugin for this project’. Apply / OK.

And you are done.

Customising error messages after validation fail in Laravel

The way Laravel outputs error messages is to include the form input name, which I find most of the time is not ideal.  The easy way to customise this is pretty easy on a small scale.  This may  not suit larger forms.

In the blade file break each $error down into its own output. Put this where the error block will show.

@if (count($errors) > 0)
     <div class="alert alert-danger">
            <ul>
                 @if ($errors->has('firstname'))
                      <li>A first name needs to be entered.</li>
                  @endif
                  @if ($errors->has('lastname'))
                       <li>A last name needs to be entered.</li>
                  @endif
             </ul>
      </div>
@endif

Here are the elements from the form.

<div class="form-group">
   <label for="title" class="muted col-sm-3 control-label">Given Name</label>
   <div class="col-sm-9">
       <input type="text" name="firstname" class="form-control" id="firstname" placeholder="First Name" >
    </div>
</div>

<div class="form-group">
    <label for="lastname" class="muted col-sm-3 control-label">Last Name</label>
    <div class="col-sm-9">
         <input type="text" name="lastname" class="form-control" id="lastname" placeholder="Last Name" >
     </div>
</div>

The lastname and firstname are the name elements of the form and are attributes used in the error message.

Installing Laravel and Laravel Spark from scratch

I had a few issues installing Laravel Spark so once I got it working I thought I might share a more detailed installation process than what has been documented on the spark website especially for Windows users.

Windows users are unable to user the spark installer so we will use the composer method.  First off you will need a number of packages installed on your PC to complete the installation.

These packages are not natively found on windows machines and do need to be installed.

  1. Composer.

Visit https://getcomposer.org/ and download and run the composer-setup.exe from the downloads page.

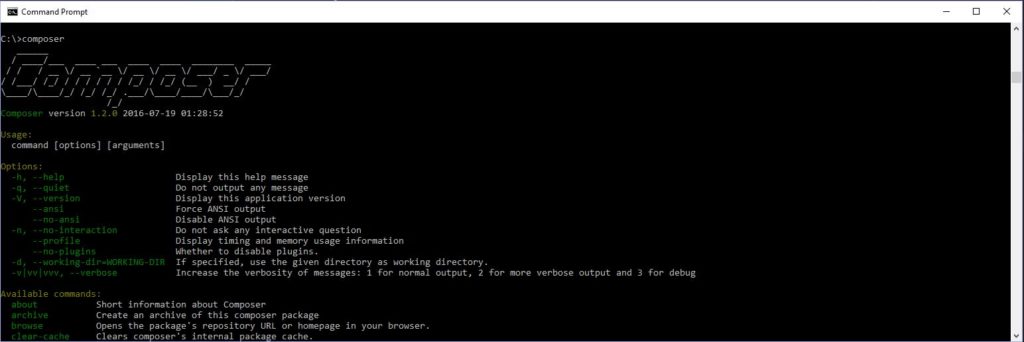
Once composer is installed you should be able to run it in the command prompt window. Search ‘CMD’ to locate the command window.  When it opens type ‘composer’ and hit enter.

composer

2. Node.js

Visit https://nodejs.org/en/ and download the latest version.  Run the install.  Open the command window and enter ‘node -v’.

This will return the version of node which is installed.

3. NPM

NPM is part of the node package and will be installed with nodejs.

Make NPM globally availble by running ‘npm install g npm

npm install -g npm

You can verify the installation of npm by entering ‘npm -v’ to get the version of NPM.

4. Gulp

We will now use NPM to install gulp.  Run the following command in the command window.

 npm install -g gulp-cli

Gulp will now be globally available as well.

Check the version by running

gulp -v

5. Git

Git is required if you are installing laravel spark. Go to https://git-scm.com/download/win and download the git package for windows.

Run the install. During the install it is important that the option “Run Git from Windows Command Prompt” is selected.  The program defaults to this.

git

Now that these packages have been installed it is time to install laravel spark.

If this is the first time Laravel has been installed on your system the Laravel installer needs to be pulled in.

composer global require laravel/installer

If you are just installing Laravel you can create a new project by running:

laravel new project-name

Once this is complete a new Laravel project is ready for development. If you have purchased Spark and are adding it to your project continue with the install process as per the documentation.

Visit https://spark.laravel.com/docs/3.0/installation#installation-via-composer to complete the installation of spark.

Important notes:

During the installation process you will run ‘composer update’ and a token then needs to be generated from GitHub during the update. You will need to create an account if you do not have one with GitHub.  This is relatively easy.  Take the default permissions through the process of creating the token.

Once a token is created copy the token somewhere safe as you will not be able to retrieve it later.  The command prompt requires the token to be inputted.  Each time I tried to add this manually or via paste it would not work and the update failed.  So I found it is easier to add the key with this command after the failed update if that occurs for you by:

composer config github-oauth.github.com AddYourTokenHere

Change AddYourTokenHere to your new token.

Then run ‘composer update’ again so that the install is successful.

Run:

npm install
gulp
php artisan migrate

Link the storage directories:

php artisan storage:link

Open up your browser and you should now have a working spark installation.


Uploading a file with ajax serialize() does not work?

This was driving me nuts as I often use Ajax to save different data without refreshing the page, however when I tried to use it for a multipart form when uploading an image, it would not work.

After a bit of searching I found this solution which worked for me.

The form:

<form class="form-inline" id="imageUpload" enctype="multipart/form-data">
    <div class="form-group" >
        <label for="file">Select image to upload:</label>
        <input type="file" name="file" id="file" >
     </div>
     <button type="submit" class="btn btn-primary">Upload Image</button>
</form>

The ajax:

<script type="text/javascript">
    $(document).ready(function() {
        $("#imageUpload").submit(function(e) {
            e.preventDefault();

            var formData = new FormData(this);

            $.ajax({
                type: "POST",
                data: formData,
                cache:false,
                contentType: false,
                processData: false,
                url: "/activity/add/photo",
                dataType: "json",
                success: function(data) {
                    $('#imagedisplay').html(data.name);
                },
                error: function() {
                    $('#imageerror').html('data.file');         
                }
            });
        });
    });
</script>