Installing Laravel and Laravel Spark from scratch

I had a few issues installing Laravel Spark so once I got it working I thought I might share a more detailed installation process than what has been documented on the spark website especially for Windows users.

Windows users are unable to user the spark installer so we will use the composer method.  First off you will need a number of packages installed on your PC to complete the installation.

These packages are not natively found on windows machines and do need to be installed.

  1. Composer.

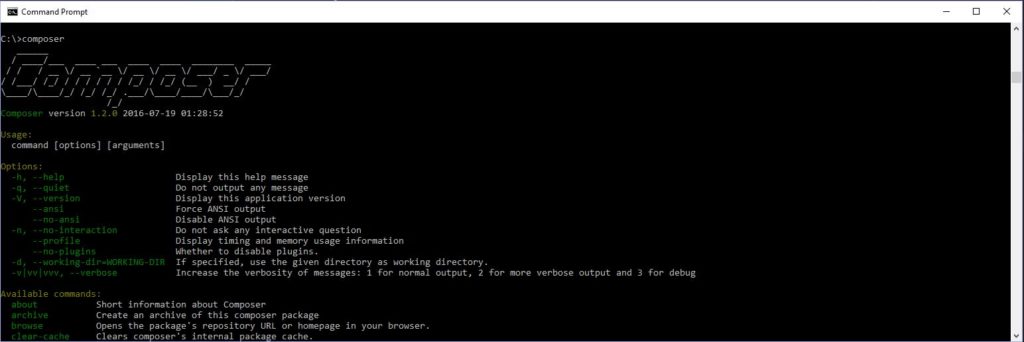
Visit https://getcomposer.org/ and download and run the composer-setup.exe from the downloads page.

Once composer is installed you should be able to run it in the command prompt window. Search ‘CMD’ to locate the command window.  When it opens type ‘composer’ and hit enter.

composer

2. Node.js

Visit https://nodejs.org/en/ and download the latest version.  Run the install.  Open the command window and enter ‘node -v’.

This will return the version of node which is installed.

3. NPM

NPM is part of the node package and will be installed with nodejs.

Make NPM globally availble by running ‘npm install g npm

npm install -g npm

You can verify the installation of npm by entering ‘npm -v’ to get the version of NPM.

4. Gulp

We will now use NPM to install gulp.  Run the following command in the command window.

 npm install -g gulp-cli

Gulp will now be globally available as well.

Check the version by running

gulp -v

5. Git

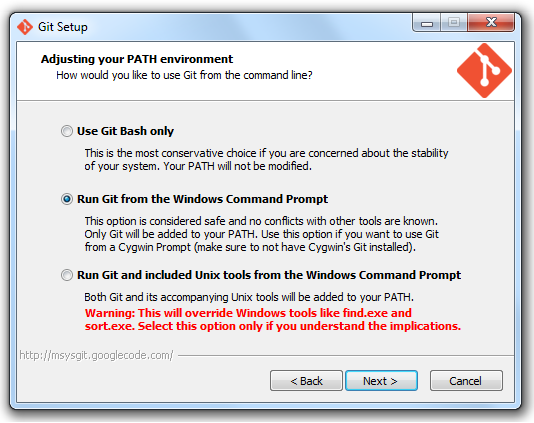
Git is required if you are installing laravel spark. Go to https://git-scm.com/download/win and download the git package for windows.

Run the install. During the install it is important that the option “Run Git from Windows Command Prompt” is selected.  The program defaults to this.

git

Now that these packages have been installed it is time to install laravel spark.

If this is the first time Laravel has been installed on your system the Laravel installer needs to be pulled in.

composer global require laravel/installer

If you are just installing Laravel you can create a new project by running:

laravel new project-name

Once this is complete a new Laravel project is ready for development. If you have purchased Spark and are adding it to your project continue with the install process as per the documentation.

Visit https://spark.laravel.com/docs/3.0/installation#installation-via-composer to complete the installation of spark.

Important notes:

During the installation process you will run ‘composer update’ and a token then needs to be generated from GitHub during the update. You will need to create an account if you do not have one with GitHub.  This is relatively easy.  Take the default permissions through the process of creating the token.

Once a token is created copy the token somewhere safe as you will not be able to retrieve it later.  The command prompt requires the token to be inputted.  Each time I tried to add this manually or via paste it would not work and the update failed.  So I found it is easier to add the key with this command after the failed update if that occurs for you by:

composer config github-oauth.github.com AddYourTokenHere

Change AddYourTokenHere to your new token.

Then run ‘composer update’ again so that the install is successful.

Run:

npm install
gulp
php artisan migrate

Link the storage directories:

php artisan storage:link

Open up your browser and you should now have a working spark installation.


Uploading a file with ajax serialize() does not work?

This was driving me nuts as I often use Ajax to save different data without refreshing the page, however when I tried to use it for a multipart form when uploading an image, it would not work.

After a bit of searching I found this solution which worked for me.

The form:

<form class="form-inline" id="imageUpload" enctype="multipart/form-data">
    <div class="form-group" >
        <label for="file">Select image to upload:</label>
        <input type="file" name="file" id="file" >
     </div>
     <button type="submit" class="btn btn-primary">Upload Image</button>
</form>

The ajax:

<script type="text/javascript">
    $(document).ready(function() {
        $("#imageUpload").submit(function(e) {
            e.preventDefault();

            var formData = new FormData(this);

            $.ajax({
                type: "POST",
                data: formData,
                cache:false,
                contentType: false,
                processData: false,
                url: "/activity/add/photo",
                dataType: "json",
                success: function(data) {
                    $('#imagedisplay').html(data.name);
                },
                error: function() {
                    $('#imageerror').html('data.file');         
                }
            });
        });
    });
</script>


Create a change password page – Laravel 5.3

Laravel 5.3  has great authentication right out of the box.  It has login, register, reset and forgot password all set up however there is no change password page which is pretty important for many applications. So, I created one and thought it might be useful to someone else so here it is.

Set up the authentication as per the documentation at Authentication.

Create a new controller in the Auth folder or anywhere else you would like to keep it.

Auth\UpdatePasswordController.php

namespace App\Http\Controllers\Auth;

use App\User;
use Illuminate\Http\Request;
use App\Http\Controllers\Controller;
use Illuminate\Support\Facades\Auth;
use Illuminate\Support\Facades\Hash;

class UpdatePasswordController extends Controller
{
    /*
     * Ensure the user is signed in to access this page
     */
    public function __construct() {

        $this->middleware('auth');

    }
    /**
     * Show the form to change the user password.
     */
    public function index(){
        return view('user.change-password');
    }

    /**
     * Update the password for the user.
     *
     * @param  Request  $request
     * @return Response
     */
    public function update(Request $request)
    {
        $this->validate($request, [
            'old' => 'required',
            'password' => 'required|min:6|confirmed',
        ]);

        $user = User::find(Auth::id());
        $hashedPassword = $user->password;

        if (Hash::check($request->old, $hashedPassword)) {
            //Change the password
            $user->fill([
                'password' => Hash::make($request->password)
            ])->save();

            $request->session()->flash('success', 'Your password has been changed.');

            return back();
        }

        $request->session()->flash('failure', 'Your password has not been changed.');

        return back();


    }
}

Create a new view file.  I put mine in a ‘User’ folder at resources\views\users\change-password.blade.php

change-password.blade.php

@extends('layouts.app')

@section ('css')
@endsection

@section('content')
<div class="container">
    <div class="row">
        <div class="col-md-8 col-md-offset-2">
            <div class="panel panel-default">
                <div class="panel-heading">Change Password</div>
                <div class="panel-body">
                @if (Session::has('success'))
                    <div class="alert alert-success">{!! Session::get('success') !!}</div>
                @endif
                @if (Session::has('failure'))
                    <div class="alert alert-danger">{!! Session::get('failure') !!}</div>
                @endif
                <form action="{{ route('password.update') }}" method="post" role="form" class="form-horizontal">
                    {{csrf_field()}}

                        <div class="form-group{{ $errors->has('old') ? ' has-error' : '' }}">
                            <label for="password" class="col-md-4 control-label">Old Password</label>

                            <div class="col-md-6">
                                <input id="password" type="password" class="form-control" name="old">

                                @if ($errors->has('old'))
                                    <span class="help-block">
                                        <strong>{{ $errors->first('old') }}</strong>
                                    </span>
                                @endif
                            </div>
                        </div>

                            <div class="form-group{{ $errors->has('password') ? ' has-error' : '' }}">
                                <label for="password" class="col-md-4 control-label">Password</label>

                                <div class="col-md-6">
                                    <input id="password" type="password" class="form-control" name="password">

                                    @if ($errors->has('password'))
                                        <span class="help-block">
                                        <strong>{{ $errors->first('password') }}</strong>
                                    </span>
                                    @endif
                                </div>
                            </div>

                            <div class="form-group{{ $errors->has('password_confirmation') ? ' has-error' : '' }}">
                                <label for="password-confirm" class="col-md-4 control-label">Confirm Password</label>

                                <div class="col-md-6">
                                    <input id="password-confirm" type="password" class="form-control" name="password_confirmation">

                                    @if ($errors->has('password_confirmation'))
                                        <span class="help-block">
                                        <strong>{{ $errors->first('password_confirmation') }}</strong>
                                    </span>
                                    @endif
                                </div>
                            </div>

                        <div class="form-group">
                            <div class="col-md-6 col-md-offset-4">
                            <button type="submit" class="btn btn-primary form-control">Submit</button>
                                </div>
                        </div>
                </form>
                </div>

            </div>
        </div>
    </div>
</div>
@endsection

@section('scripts')

@endsection

Make a couple of new routes in ‘web.php’.

Route::get('change-password', 'Auth\UpdatePasswordController@index')->name('password.form');
Route::post('change-password', 'Auth\UpdatePasswordController@update')->name('password.update');


Redirect admin and users to different pages after login – Larvel 5.3

I am using Laravel 5.3. and I am using the authentication which comes out of the box with this version.

I needed to differentiate between different user roles when someone logs in to send them to appropriate pages relevant to their role.

In my users table I have a ‘role’ column for the sake of ease of use.

This was my solution for my needs.

Locate this file: App\Http\Controllers\Auth\LoginController.php

Add this method below the __construct

public function authenticated()
    {
        if(isset(Auth::user()->role))
        {
            if (Auth::user()->role == Constants::ROLE_ADMINISTRATOR)
            {
                return redirect('/admin');
            }
           
            return redirect('/guest');
            
        }
    }

Be sure to include the Auth class. e.g.

use Illuminate\Support\Facades\Auth;

Note: the ‘Constants::ROLE_…” are constants I have in my code.  You may just have a number e.g. 1 for admin and 2 for guest. So it could read (Auth::user()->role == 1 )

An admin will now be directed to the ‘/admin’ page while a guest will be directed to the ‘/guest’ page after they login.

Tips or suggestions. Let us know in the comments.