Laravel event handler for last login

I recently needed to show on the admin side of an app the last login of all users and if they had logged in at all.  I also wanted to show the user the last time that they visited the site.  I used event handlers for both these tasks.

Update the Users Table

I have used the user model to store a timestamp for each event, so I added two new rows to my users table.  I will then be able to access these easily in my blade template.

$table->timestamp('latest_login')->nullable();
$table->timestamp('previous_visit')->nullable();

On the user model I also added both timestamps to the proteced $dates array. By doing this I will be able to use ‘Carbon’ helpers like ‘diffForHumans’.

protected $dates = [
        'created_at',
        'updated_at',
        'latest_login',
        'previous_visit'
    ];

Creating the Event Handlers:

On the admin side I used the login event and for the user I used the logout event to record the current time and date to the users table.

In the EventServiceProvider service provider (app/Providers/EventServiceProvider.php) I added the following to the $listen array:

'Illuminate\Auth\Events\Login' => [
    'App\Listeners\Users\LatestLogin',
],
'Illuminate\Auth\Events\Logout' => [
    'App\Listeners\Users\PreviousLogin',
],

I then ran php artisan event:generate. This command then creates two event listeners located at app\Listeners\Users\LatestLogin and app\Listeners\Users\PreviousLogin.

Each event listener’s handle()method I added the following.  

public function handle(Login $event)
    {
        $event->user->latest_login = Carbon::now();
        $event->user->save();
    }
 public function handle(Logout $event)
    {
        $event->user->previous_visit = Carbon::now();
        $event->user->save();
    }

I also added:

use Carbon\Carbon;

to each listener.

Now when a user logs in or logs out the event listener fires and updates the appropriate row of the users table for the user.

Blade

Finally for completeness in my blade file I can call:

{{ $user->latest_login->diffForHumans() }}

And it will output something like – 1 hour ago – or however long it was since the user signed in.

For the user in the view I add:

Last Visit: {{ Auth::user()->previous_visit->diffForHumans() }}

It outputs something like: Last Visit: 2 days ago

That is about it. I hope this helps someone else out.
Laravel Raw Statements for Database Queries

Laravel has a powerful query builder but there are limitations when database queries become more complex.  Enter Raw queries.

The docs have an example  of a raw query which will get you going but sometimes there is a need to completely ditch the builder and and go it alone.

The following example is what I used create a query which is completely raw.

DB::select(DB::raw('
        SELECT  Months.id AS `month` ,
            COUNT(story.id) AS `count`
            FROM 
            (
              SELECT 1 as ID UNION SELECT 2 as ID UNION  SELECT 3 as ID UNION SELECT 4 as ID 
              UNION  
              SELECT 5 as ID UNION SELECT 6 as ID UNION SELECT 7 as ID UNION SELECT 8 as ID 
              UNION  
              SELECT 9 as ID UNION SELECT 10 as ID UNION SELECT 11 as ID UNION SELECT 12 as ID
            ) as Months
            LEFT JOIN `story` on Months.id=month(story.created_at)
                                   AND 
                                   (company_id = :companyId) 
                                   AND (YEAR(created_at)= :thisYear)
            GROUP BY Months.id 
            ORDER BY Months.id ASC'), array('companyId'=>Auth::user()->company_id, 'thisYear'=>Carbon::now()->year));

The important thing to notice here is that when using the raw query you can pass variables straight into the query which could be a security issue especially if the information is being passed from a from by a user.

To ensure that any values that need to be passed to the query are sanitized they can be passed in an array after the query.

Take a look at the query and the ‘And’ clauses.

company_id = :companyId

The :companyId in the example is how you add your variables using the array.

...ORDER BY Months.id ASC'), array('companyId'=>Auth::user()->company_id, 'thisYear'=>Carbon::now()->year));

In the array give the key and then the value to be added.

That is it.  Hope it helps with your complex Laravel queries.

cURL error 60: SSL certificate problem: unable to get local issuer certificate – Laravel Notifications error

In a new application I was adding in Slack notifications and while testing I got cURL error 60: SSL certificate problem: unable to get local issuer certificate...

I am working on a Windows 10 machine with xampp.  I found the solution on Laracast Forum with a little bit of effort so I thought I would outline the steps succinctly to save a little time in the future.

I am going to assume that you have a version of Guzzle which is 6.2 or around that.

Step 1.

Download a fresh PEM file from this link https://gist.github.com/VersatilityWerks/5719158/download

This is a zip file which you will save into xampp.

Step 2

Unzip this file and save the file cacert.pem in D:/xampp/php/extras/ssl.

Step 3

Update the php.ini file.  D:/xampp/php/php.ini

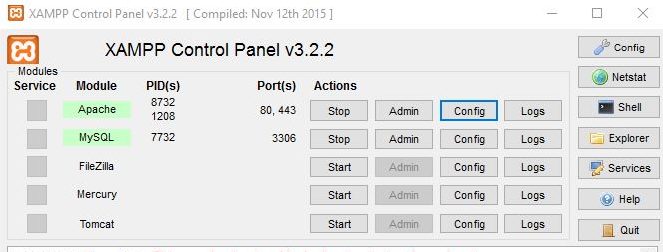
Alternatively to locate the php.ini file open the XAMPP control panel and click on Config adjacent to Apache.

Search and find curl.cainfo and add the full path to the the cacert.pem file you just added.
The new line should be something like this:
curl.cainfo = D:\xampp\php\extras\ssl\cacert.pem

Step 4

Restart Apache and try and fire off your notification again. It should just work now.

Customising error messages after validation fail in Laravel

The way Laravel outputs error messages is to include the form input name, which I find most of the time is not ideal.  The easy way to customise this is pretty easy on a small scale.  This may  not suit larger forms.

In the blade file break each $error down into its own output. Put this where the error block will show.

@if (count($errors) > 0)
     <div class="alert alert-danger">
            <ul>
                 @if ($errors->has('firstname'))
                      <li>A first name needs to be entered.</li>
                  @endif
                  @if ($errors->has('lastname'))
                       <li>A last name needs to be entered.</li>
                  @endif
             </ul>
      </div>
@endif

Here are the elements from the form.

<div class="form-group">
   <label for="title" class="muted col-sm-3 control-label">Given Name</label>
   <div class="col-sm-9">
       <input type="text" name="firstname" class="form-control" id="firstname" placeholder="First Name" >
    </div>
</div>

<div class="form-group">
    <label for="lastname" class="muted col-sm-3 control-label">Last Name</label>
    <div class="col-sm-9">
         <input type="text" name="lastname" class="form-control" id="lastname" placeholder="Last Name" >
     </div>
</div>

The lastname and firstname are the name elements of the form and are attributes used in the error message.

Create a change password page – Laravel 5.3

Laravel 5.3  has great authentication right out of the box.  It has login, register, reset and forgot password all set up however there is no change password page which is pretty important for many applications. So, I created one and thought it might be useful to someone else so here it is.

Set up the authentication as per the documentation at Authentication.

Create a new controller in the Auth folder or anywhere else you would like to keep it.

Auth\UpdatePasswordController.php

namespace App\Http\Controllers\Auth;

use App\User;
use Illuminate\Http\Request;
use App\Http\Controllers\Controller;
use Illuminate\Support\Facades\Auth;
use Illuminate\Support\Facades\Hash;

class UpdatePasswordController extends Controller
{
    /*
     * Ensure the user is signed in to access this page
     */
    public function __construct() {

        $this->middleware('auth');

    }
    /**
     * Show the form to change the user password.
     */
    public function index(){
        return view('user.change-password');
    }

    /**
     * Update the password for the user.
     *
     * @param  Request  $request
     * @return Response
     */
    public function update(Request $request)
    {
        $this->validate($request, [
            'old' => 'required',
            'password' => 'required|min:6|confirmed',
        ]);

        $user = User::find(Auth::id());
        $hashedPassword = $user->password;

        if (Hash::check($request->old, $hashedPassword)) {
            //Change the password
            $user->fill([
                'password' => Hash::make($request->password)
            ])->save();

            $request->session()->flash('success', 'Your password has been changed.');

            return back();
        }

        $request->session()->flash('failure', 'Your password has not been changed.');

        return back();


    }
}

Create a new view file.  I put mine in a ‘User’ folder at resources\views\users\change-password.blade.php

change-password.blade.php

@extends('layouts.app')

@section ('css')
@endsection

@section('content')
<div class="container">
    <div class="row">
        <div class="col-md-8 col-md-offset-2">
            <div class="panel panel-default">
                <div class="panel-heading">Change Password</div>
                <div class="panel-body">
                @if (Session::has('success'))
                    <div class="alert alert-success">{!! Session::get('success') !!}</div>
                @endif
                @if (Session::has('failure'))
                    <div class="alert alert-danger">{!! Session::get('failure') !!}</div>
                @endif
                <form action="{{ route('password.update') }}" method="post" role="form" class="form-horizontal">
                    {{csrf_field()}}

                        <div class="form-group{{ $errors->has('old') ? ' has-error' : '' }}">
                            <label for="password" class="col-md-4 control-label">Old Password</label>

                            <div class="col-md-6">
                                <input id="password" type="password" class="form-control" name="old">

                                @if ($errors->has('old'))
                                    <span class="help-block">
                                        <strong>{{ $errors->first('old') }}</strong>
                                    </span>
                                @endif
                            </div>
                        </div>

                            <div class="form-group{{ $errors->has('password') ? ' has-error' : '' }}">
                                <label for="password" class="col-md-4 control-label">Password</label>

                                <div class="col-md-6">
                                    <input id="password" type="password" class="form-control" name="password">

                                    @if ($errors->has('password'))
                                        <span class="help-block">
                                        <strong>{{ $errors->first('password') }}</strong>
                                    </span>
                                    @endif
                                </div>
                            </div>

                            <div class="form-group{{ $errors->has('password_confirmation') ? ' has-error' : '' }}">
                                <label for="password-confirm" class="col-md-4 control-label">Confirm Password</label>

                                <div class="col-md-6">
                                    <input id="password-confirm" type="password" class="form-control" name="password_confirmation">

                                    @if ($errors->has('password_confirmation'))
                                        <span class="help-block">
                                        <strong>{{ $errors->first('password_confirmation') }}</strong>
                                    </span>
                                    @endif
                                </div>
                            </div>

                        <div class="form-group">
                            <div class="col-md-6 col-md-offset-4">
                            <button type="submit" class="btn btn-primary form-control">Submit</button>
                                </div>
                        </div>
                </form>
                </div>

            </div>
        </div>
    </div>
</div>
@endsection

@section('scripts')

@endsection

Make a couple of new routes in ‘web.php’.

Route::get('change-password', 'Auth\UpdatePasswordController@index')->name('password.form');
Route::post('change-password', 'Auth\UpdatePasswordController@update')->name('password.update');


Redirect admin and users to different pages after login – Larvel 5.3

I am using Laravel 5.3. and I am using the authentication which comes out of the box with this version.

I needed to differentiate between different user roles when someone logs in to send them to appropriate pages relevant to their role.

In my users table I have a ‘role’ column for the sake of ease of use.

This was my solution for my needs.

Locate this file: App\Http\Controllers\Auth\LoginController.php

Add this method below the __construct

public function authenticated()
    {
        if(isset(Auth::user()->role))
        {
            if (Auth::user()->role == Constants::ROLE_ADMINISTRATOR)
            {
                return redirect('/admin');
            }
           
            return redirect('/guest');
            
        }
    }

Be sure to include the Auth class. e.g.

use Illuminate\Support\Facades\Auth;

Note: the ‘Constants::ROLE_…” are constants I have in my code.  You may just have a number e.g. 1 for admin and 2 for guest. So it could read (Auth::user()->role == 1 )

An admin will now be directed to the ‘/admin’ page while a guest will be directed to the ‘/guest’ page after they login.

Tips or suggestions. Let us know in the comments.